Step-by-Step Guide: Installing the Experimental Ubuntu 26.04 on CIX P1 Armv9 Single-Board Computers
Introduction
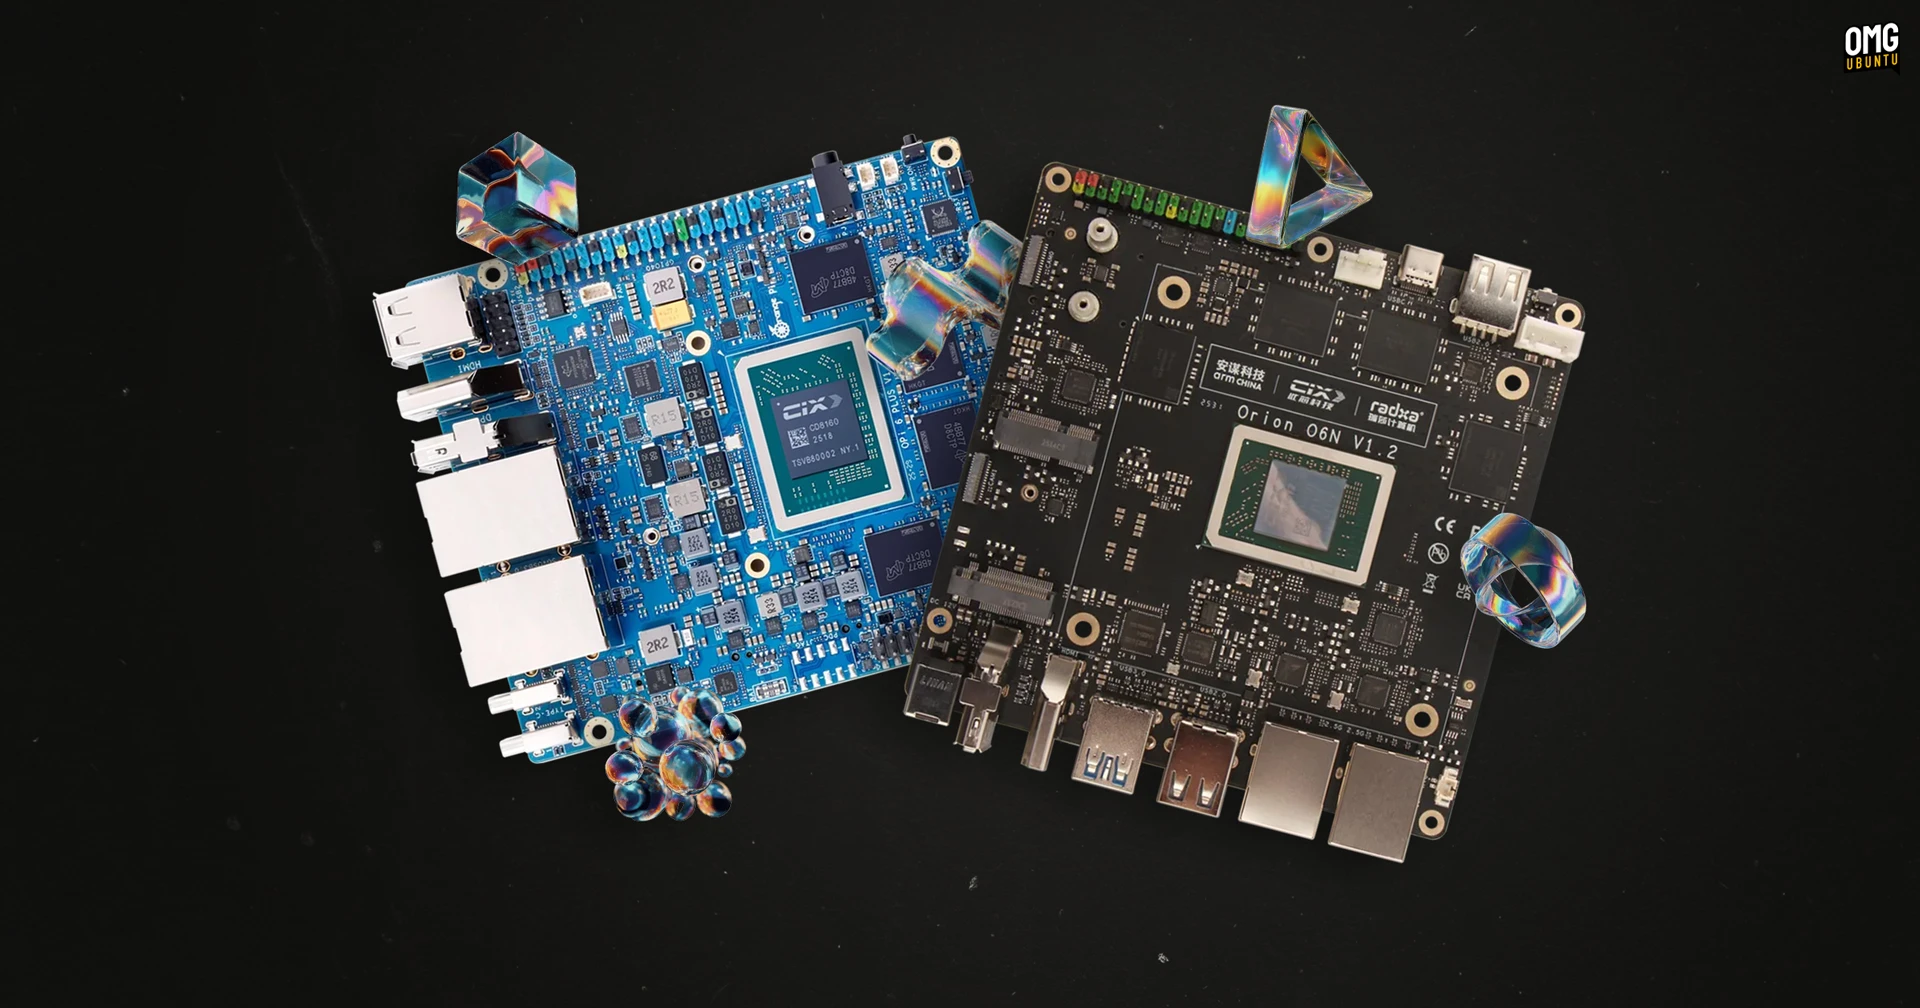
Canonical has released a concept build of Ubuntu 26.04 tailored for the CIX P1 platform—an Armv9 reference design that powers cutting-edge single-board computers (SBCs) like the Radxa Orion O6 and Orange Pi 6 Plus. This experimental image lets you experience Ubuntu on the latest Arm architecture, offering improved performance and security features. In this guide, you’ll learn how to download, write, and boot this concept build on your compatible SBC. Follow each step carefully to get Ubuntu 26.04 up and running.

What You Need
- Compatible SBC: Radxa Orion O6, Orange Pi 6 Plus, or any CIX P1‑compliant Armv9 board.
- MicroSD card (16GB or larger) or an eMMC module (if supported).
- Computer with an SD card reader (or USB adapter) to write the image.
- Ubuntu 26.04 concept image for CIX P1 – download from Canonical’s official repository (check the OMG! Ubuntu article for links).
- Image writing tool – balenaEtcher (recommended) or
ddon Linux/macOS. - Power supply appropriate for your board (typically USB‑C PD).
- HDMI cable and monitor (optional, for first boot).
- USB keyboard and mouse (or SSH access).
Step-by-Step Instructions
Step 1: Download the Ubuntu 26.04 Concept Image
Visit Canonical’s download page for the CIX P1 concept build. Look for a file named ubuntu-26.04-concept-cixp1.img.xz or similar. Ensure you choose the correct variant for your SBC (e.g., Radxa Orion O6 vs. Orange Pi 6 Plus may share the same image if both use CIX P1). Verify the SHA256 checksum if provided to avoid corrupted files.
Step 2: Prepare Your Storage Medium
Insert your microSD card (or connect eMMC) into your computer. Warning: The next step will erase all data on the target drive. Use a fresh card or back up any important files.
- Using balenaEtcher: Open Etcher, select the downloaded
.xzimage (it handles decompression automatically), choose your SD card, and click “Flash.” - Using
dd(Linux/macOS): Decompress the image first:xz -d ubuntu-26.04-concept-cixp1.img.xz. Then identify your SD card device (e.g.,/dev/sdX) withlsblkand run:sudo dd if=ubuntu-26.04-concept-cixp1.img of=/dev/sdX bs=4M status=progress. Sync withsyncafter completion.
Once writing finishes, safely eject the card.
Step 3: Insert the Card and Connect Peripherals
Place the microSD card into your SBC’s slot. Connect an HDMI display, USB keyboard, and mouse. If you plan to use SSH later, ensure your network cable (or Wi‑Fi dongle) is plugged in. Do not power on the board yet.
Step 4: Power On and Watch for Boot Messages
Connect your board’s power supply. Most CIX P1 devices boot automatically when power is applied. On first boot, you may see U‑Boot splash followed by kernel messages. If the image is correctly written, you should eventually see the Ubuntu 26.04 login prompt or graphical desktop (if a desktop image). Wait patiently – initial boot can take a few minutes as it expands the root filesystem.
Step 5: Login and Initial Setup
If a graphical login appears, use the default credentials (commonly ubuntu / ubuntu). If only a terminal is shown, log in with the same credentials. You’ll be prompted to change the password on first login. Follow the on-screen instructions to set up your locale, keyboard layout, and time zone.
Step 6: Update System and Install Drivers
After logging in, open a terminal and run:
sudo apt update && sudo apt full-upgrade -yThis will fetch the latest packages for this concept build. Additionally, check for firmware updates:
sudo apt install linux-firmware -yIf your SBC uses a Wi‑Fi module, you may need to install the appropriate driver – refer to the board’s documentation.
Step 7: Explore Armv9 Features
Once the system is stable, you can test Armv9 capabilities. For example, enable Memory Tagging Extension (MTE) to detect memory safety bugs by passing kasan=on in the kernel command line (edit /boot/firmware/cmdline.txt or use fw_setenv). Note that this is a concept build, so some features may be experimental.
Tips for Success
- Backup your data: This is an experimental build – do not rely on it for production work. Keep another SD card with a stable OS handy.
- Use a heatsink/fan: Armv9 SBCs can run hot under load. Ensure adequate cooling to prevent throttling.
- Check community resources: For known issues with the Radxa Orion O6 or Orange Pi 6 Plus, visit forums or GitHub repositories dedicated to the CIX P1 platform.
- Boot from eMMC (advanced): If your board has eMMC, you can flash the image directly using
ddafter entering USB download mode. Consult your board’s manual for jumper settings. - Network boot alternative: Some CIX P1 boards support TFTP/PXE – ideal for testing without wearing out an SD card.
- Report bugs: Since this is a concept build, Canonical welcomes feedback. Use the
ubuntu-bugtool or file issues on Launchpad.
By following this guide, you can experience the future of Ubuntu on Armv9 hardware. Enjoy exploring the potential of CIX P1 devices!
Related Articles
- How to Use Firefox's Free VPN with Server Location Choice
- How Meta's AI Agents Drive Hyperscale Efficiency at Scale
- Automating Hyperscale Efficiency: A Step-by-Step Guide to Meta's AI-Powered Capacity Optimization
- Mastering Fedora Silverblue: Your Guide to Rebase to Fedora Linux 44
- Debian 14 'Forky' Makes Reproducible Builds Mandatory: A New Era for Linux Security
- Linux 7.2 Kernel Update: 'Fair' DRM Scheduler and AMD AIE4 Hardware Integration Coming
- Critical 'Copy.Fail' Vulnerability Exposes Linux Kernel to Instant Root Access Across Major Distributions
- Getting Started with Sealed Bootable Container Images on Fedora Atomic Desktops