How to Personalize Your AWS Console: A Step-by-Step Guide to Account Colors, Regions, and Service Visibility
By
Introduction
Managing multiple AWS accounts and navigating a cluttered console can slow you down. In August 2025, AWS introduced User Experience Customization (UXC) to help you tailor the Management Console interface. Now, with the latest updates, you can assign distinct colors to accounts, hide irrelevant Regions, and filter out unneeded services. This guide walks you through each customization step so you can reduce cognitive load, minimize clicks, and focus on what matters most for your workflows.
What You Need
- An AWS account with administrative privileges (for account-level settings).
- A web browser with access to the AWS Management Console.
- Your AWS account name visible in the navigation bar (top-right).
- Familiarity with the gear icon (settings) on the console navigation bar.
Step-by-Step Instructions
Step 1: Set an Account Color
- Sign in to the AWS Management Console.
- On the top navigation bar, click your account name.
- From the dropdown menu, choose Account.
- In the Account display settings section, select a color from the palette (e.g., orange for development, light blue for testing, red for production).
- Click Update to save your choice. The selected color now appears next to your account name in the navigation bar, helping you instantly identify the account’s purpose.
Step 2: Access Account-Level Customization Settings
- Click the gear icon (settings) on the navigation bar.
- Select See all user settings.
- If you hold an administrator role, you’ll see a new Account settings tab in the unified settings menu. Click it. (If you’re not an admin, you can still customize your own view, but account-level visibility controls require admin privileges.)
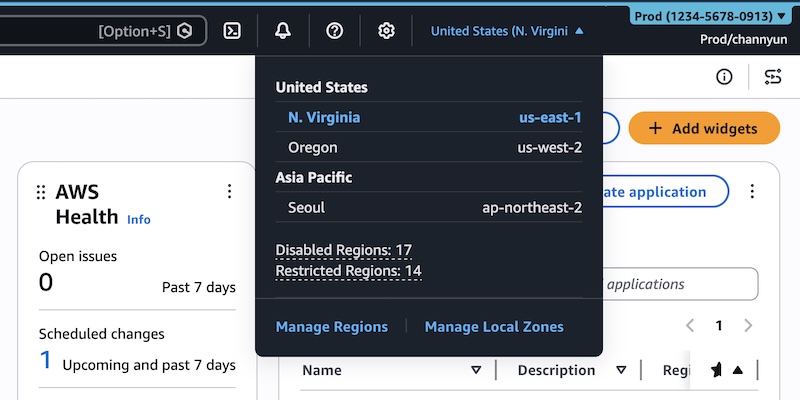
Step 3: Choose Which AWS Regions to Display
- Under the Account settings tab, locate the Visible Regions section.
- Click Edit.
- You have two options:
- All available Regions – shows every Region (default).
- Select Regions – manually pick only the Regions your team uses.
- If choosing Select Regions, check the boxes for the Regions you want to see (e.g., us-east-1, eu-west-1).
- Click Save changes. Now the Region selector on the navigation bar will only list the Regions you selected.
Step 4: Filter the Services Menu
- Still in the Account settings tab, find the Visible Services section.
- Click Edit.
- Use the search box or browse by category (e.g., Popular services).
- Select the services you frequently use (e.g., EC2, S3, Lambda). Uncheck all others.
- Click Save changes. The All services menu on the navigation bar now shows only your chosen services. When you type a service name in the search bar, only selected services appear.
Step 5: Verify Your Customizations
- Return to the main console. Confirm that the account color appears on the top bar.
- Open the Region selector – you should see only the Regions you enabled.
- Open the All services menu or use the search bar – only filtered services are listed.
Tips for a Smoother Experience
- Use color strategically: Assign the same color scheme across your organization (e.g., red for production, green for staging) to avoid confusion.
- Start with a minimal set: Begin by hiding all Regions and services except the ones you use daily. You can always re-enable them later.
- Remember: These settings only affect the console UI. They do not restrict access via AWS CLI, SDK, API, or Amazon Q Developer. Users with the correct permissions can still interact with any Region or service programmatically.
- To revert changes, go back to the same settings page and choose “All available Regions” or re-select all services.
- Coordinate with your team: If you’re an administrator, share a standardized list of Regions and services so everyone benefits from a consistent, focused interface.
By following these steps, you’ll transform your AWS Management Console into a streamlined workspace tailored exactly to your needs—saving time and reducing visual noise.

Related Articles
- Mastering Narrative Tempo: A Case Study on Shigeru Miyamoto’s Defense of Fast Pacing in The Super Mario Galaxy Movie
- 10 Reasons Why Mouse P.I. for Hire Deserves Better on Nintendo Switch 2
- GameStop Launches $56 Billion Hostile Bid for eBay in Amazon Rivalry
- Xbox Appoints Gaming Industry Analyst as New Strategy Chief: A Deep Dive into Matthew Ball's Role
- OpenAI Explains the Strange 'Goblin' Quirk in Its AI Coding Tool: A Q&A
- Anbernic RG Rotate Handheld Console: Flip-Out Display Gaming on a Budget
- Nintendo Surprise Unveils First Star Fox Game in Over a Decade – Launching Next Month on Switch 2
- Alabaster Dawn: Why This 2.5D Action-RPG Challenges the Need for Fully 3D Worlds